
I was disappointed that I couldn’t do Return to the Scene of the Crime with a photo that wasn’t directly linked to me.
For the Return to the Scene of the Crime assignment, can we use another person’s photos from the past? Not just ones that we took? #ds106
— Brooke Parker (@bparker5) February 13, 2013
@bparker5 Thats fine, but really for this assignment it should be your story.
— Alan Levine (@cogdog) February 13, 2013
But then I found this assignment called Before and After!!
The task: use a photograph from the past and digitally blend it with an image of the present.
A History major getting to use history?!?!!

Now this took me awhile, so I’m glad it’s worth four stars.
I needed digital images of UMW. Luckily, I have done quite a few projects in the Archives of UMW, so I went back to the site and grabbed a number of photos that I thought I could recreate.
Then I wandered around UMW for awhile. I took hundreds of photos and changed batteries five times. I wouldn’t know if I got the right angle until I got back into Photoshop to test it. I would love to know if anyone knows how to not wait until Photoshop, though!
I took my many images and put the ones that I matched up with my eyes into Photoshop.
I really wanted to do Monroe Hall, and I took some EPIC photos for my scrapbook, but they weren’t matching the archival photos.
Alas, I had to turn to my Trinkle photos.
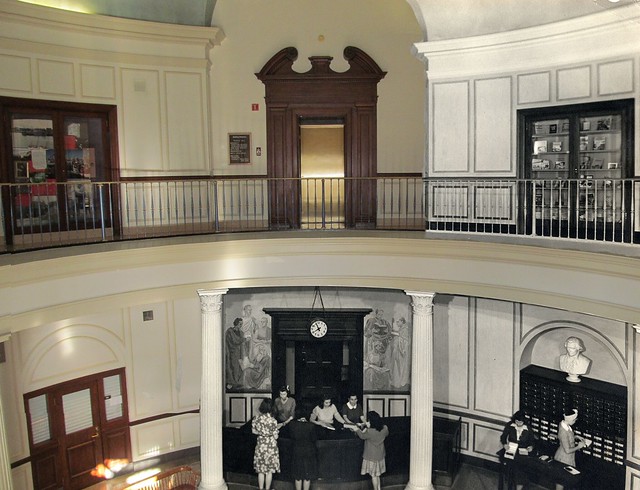
This is the photo I found to match up the most:

Then I took this photo from the Archives @ UMW:

The photos don’t match up completely, though, so I had to do some finessing.
Here is the final edit:
How I did it
1. I opened both images in Photoshop in separate windows.
2. I copied the archival photo on top of the new photo. At first, I didn’t know where to start. I just used the Eraser and erased parts of the archival photo to see if it would match up.
3. I remembered the layer options, though, and changed the opacity so I could see both images. With this method, I was able to match up most of the edges.
4. I stretched parts of the image, but you can’t really tell.
5. Then I started erasing! I used the Eraser with 75% thickness and 100 size for most of the erasing. I didn’t really know where I wanted the lines to be between the old and the new. I realized, since some of the edges didn’t match up completely, I needed to direct their eyes elsewhere.
6. I picked areas that could easily be concealed, like the rim of Trinkle in the middle and the door to the second floor elevator.
And viola! That’s all it took.

Add a comment