
This one was cool. I ended up just stumbling across this assignment even though it was one of the suggested ones for the week.
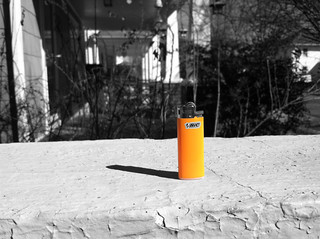
Really not that hard to do. Took me a little time to think of something to take a picture of and then thinking of a good background. I ended up picking the lighter because it was bright and would really jump out against a background. Then I decided on the side of my front porch because I thought it was an interesting background because there was a lot going on. The angle of the shot took me a while to figure out because I wanted to get as little of the wall and as much of the background as I could. Getting the size of the lighter was important too.
To actually do the assignment, I opened the photo into GIMP. After doing that, I opened it again so that I now had two of the same photo opened (you’ll understand why in a little bit). I made the first photo black and white by going to Colors>Colorify>Ok. This makes the image black and white. Then I went to the photo that was still in color. Zoom in on whatever thing you want colored or if the item is large enough you don’t have to. After finding a good distance to be accurate, choose the Scissors Select Tool (I is the shortcut on the keyboard) and click your mouse all around the colored image. For mine, I cut all around the edge of the lighter.
After you’ve cut around the whole thing, click the middle of it. Then go to Edit>Copy. Go back to your Black and White image and hit Edit>Paste As>New Layer. This assures that the layers don’t get messed up. You’ll need to use the Move tool (shortcut M) to move the colored product over to where it should go. If you needed to zoom to cut it out, you’ll probably need to zoom to put it back in right. After that, all you need to do is export the image (gimp doesn’t automatically save a normal picture format). All you need to do is go to File>Export and change the save file to whatever you want to call it, and end it in .jpg (it should look like xxxx.jpg).
I went a little farther with my lighter. After I had cut out the color with the Scissor Select tool, I pasted my color into a new image. From there, I removed the BIC logo from my picture because I only wanted the orange of the lighter with no other color. Honestly, I didn’t really need to do that–the logo doesn’t have that much color in it anyway. And that’s how you color splash an image!

Add a comment