Webstories Tutorial
As part of the "Telling Stories on/in the Web" unit for DS106, we'll be using Firefox and the Firebug extension to intervene in the code of Web pages and build our own narrative spaces. You can read more about the assignment here and here.
As you work on this assignment here's some more information, tips, and advice.
Contents
The Tools
You'll need to make sure you have Firefox installed on your computer. Firefox is just a browser, but one of it's cool features is that it allows you install "add-ons" which are really just small programs that extend Firefox's capabilities.
For this assignment, you'll be working with the extension, Firebug. You can get Firebug here. When you go this site (after install Firefox), you just need to click on the big "Install Firebug" button. This will open up a dialog box asking you to confirm that you want to install the add-on (NOTE: You'll probably first see a Yellow warning bar appear at the top of your browser window asking if you really want to let this page install something. You can just approve this and continue.) Before you can use Firebug, you'll need to restart Firefox, which should happen automatically as part of the installation procedure.
In addition to Firebug, you'll need a way to capture a screenshot of the work you do for this assignment. It's important that you have a way to capture the WHOLE browser window, even the part that may you need to scroll to see. There are a couple of options:
- Fireshot is a PC-only Firefox add-on that allows you capture whole window screenshots in the browser.
- Screengrab is another add-on that works on both Mac & PC.
- Page Saver is another add-on that works on both Mac & PC, but I haven't tested it out.
- Duck Capture is a free Windows application that let's you capture scrolling windows.
- Screenshot Captor is another PC program that allows you to capture scrolling windows.
WARNING!! Before you proceed with the assignment, make sure you have a way to capture the whole window in your browser!! Test out whatever software/add-on you're going to use before proceeding!!
Once you have this set up, you're ready to start the assignment.
Firebug (and HTML) Basics
Before picking a site to tell your story in, it's worth browsing to a site you're considering and taking a look at the code. Basically, once you're on the site you're interested you can just right-click on any element in the page and choose "Inspect Element." This will open up the Firebug panel at the bottom of your browser window.
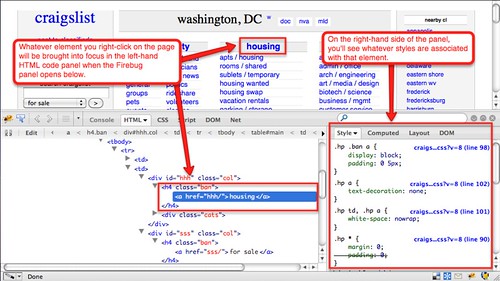
Spend some time browsing through the elements on your page. You should see a number of common HTML tags appear in the HTML code panel.
An important thing to know about HTML tags is that they almost always come in pairs. For every "opening" tag (ex: <a>), you'll see a "closing" tag (ex: </a>). There are a few exceptions: Image tags, for example (<img>) dont' require a closing tag because they contain all the information within them to embed an image. In those cases, the closing slash will just come at the end of the tag:
<img src="http://www.someurl.com" />
Here's a run down of a few tags to look for:
- <h1>, <h2>, <h3>, etc.: These are "Header" HTML tags. They're used to denote text headings on the page to help structure the content. Since they are text elements, you can usually edit them easily.
- <p>: These are "paragraph" HTML tags. They're used to denote paragraphs of text. You should be able to easily edit the text content within <p> tags.
- <img>: These are "image" HTML tags. They're used to embed image files on the page. You CAN edit images, but it's trickier. You'll have to create a new image (of the same dimensions) in an editor like Photoshop. Then you'll have to upload it somewhere on the Web (like to your Flickr account). Then you'll have to grab the URL of the file you uploaded and replace the existing source URL in the code with the your URL. It's definitely doable, but it's a multi-step process.
- <ul> and <ol>: These are the HTML tags for lists (unordered, and ordered/numbered, respectively). Within them, you'll also see <li> tags which are the actual list items.
- <div>: These are "division" HTML tags. They're used to denote containers of content on a Web page. What's in that container can be just about anything: paragraphs of text, bulleted/numbered lists, images, flash/embedded content
- <a>: These are the "anchor" HTML tags -- they're used to create links. They'll have a property called "href" which corresponds to the URL that's being linked to. Anything that appears within the <a></a> tags will be the actual link (this can be text or image).
Choosing a Site for Your Story
As you think about what site you want to use, you'll want consider how editable it is. Generally, I don't discourage anyone from working with a site if they REALLY want to, but be aware that some sites might be trickier with. A few things to consider:
- Image-rich sites: The more image-heavy your page is, the harder it's going to be to substantially edit it. Some sites/pages are made up almost entirely of images. Editing a site like this will take substantial Photoshop/image editing skills.
- Complex layouts: The more complex the over layout a page, the more difficult it may be to work with (This isn't always true. It really depends on how well-coded the page is.)
- Embedded media: If the page contains embedded video/flash, you probably won't be able to modify those elements (unless you REALLY want a challenge).
- Varied Elements: You should try and find a site that offers you different kinds of elements to edit. Consider that each editable element is an opportunity for you to enrich your story and narrative. Pick pages that offer you plenty of opportunities to play in the space.
Warnings and First Steps
There is one huge WARNING as you are working on this assignment. Here's the thing: As you make edits in Firebug, you'll see those changes in the page your viewing. However, if you refresh or accidentally click a link on the page and browse away, all your changes will be gone!! Here's a way to work that I recommend:
- Before you start, open up a text editor (TextPad, TextEdit, Text Wrangler, etc.)
- In the Firebug HTML panel below, click on the opening <html> tag to highlight it. Right-click and choose "Copy HTML".
- In your open text document, paste the code you just copied.
- You'll now have the entire code of your page in a text file, backed up.
- At the top of the page, add the following code (you can put this right after the <head> tag)
<base href="http://www.url.com"> (Replace that URL with the URL of the page you're actually editing -- this will preserve links to images, scripts, etc.)
- Save your page with some descriptive one-word title and the extension ".html".
- In your browser, open this file. You should see an copy of the page you're working with, now saved locally on your computer.
I recommend periodically stopping, recopying your entire code, and pasting it into this text HTML file. Whenever you do this, stop and refresh your page, and you'll be seeing the new local version. This way, if you do accidentally browse away, you won't lose all your work!!
Editing the Pages
Since every Web page is different, there is no single path through this assignment. Instead here are a few pointers on using Firebug that should help.
Simple Text Editing
Whenever you want to edit the text of an element, the easiest thing to do is to right-click on it. The Firebug panel will immediately jump to that element in the code, and you should be able to see the text in the panel. Editing it is as simple as clicking on the text and making your changes. When you click elsewhere in the panel, you should be able to see your changes reflected in the code as well as in the page above.
More Complex Tag/Text Editing
Occasionally, you may want to make more substantial changes to your code. In these cases, I suggest you use the "Edit" button in the Firebug panel. Simply highlight the element you want to edit and then click the button. A simple text editor will appear in which you can make your changes. When you're done, click the button again.
Removing Elements on a Page
You may find that there are elements on your page which you need to remove (for example, extra elements in a list). Doing this is really easy in Firebug. Simply, right-click on the element in the Firebug HTML panel, and choose "Delete Element."
Copying/Duplicating Elements on a Page
You may also want to duplicate existing elements on a page. To do this, you basically want to copy the code of the element and then paste it somewhere else on the page:
- Click on the element you want to copy and click the Edit button. In the editor that appears, select and copy the code. Close the Edit interface.
- Click on the element before or after which you want to add your new code. Click the Edit button, and in the Edit interface, simply paste your code wherever you want it to appear.
Styling Elements
Really, working with the styles on your page is a class session or two, in and of itself. I encourage you to try and work with the existing styles on the page (after all, the point is to co-opt an existing place/aesthetic). However, if you want to modify the styling, you can do so in the right-hand Style panel.
- You can toggle any visible style off by clicking the little circle with a line through it that appears when you mouse over it.
- If you know CSS and want to add a property to a style, you can do so by right-clicking on the style and choosing "New Property."
- If you want to modify an existing style's property, simply click on it's value and edit it.
If you're looking for a CSS resource, I highly recommend the W3Schools CSS offerings: http://www.w3schools.com/css/default.asp You'll find a ton of information here about every CSS style and property.
Uploading Your HTML File
When you're done, you'll want to upload the HTML file you've been working on (be sure to copy the final code one last time) to your Web account. One easy way to do this is through cPanel:
- Login to your cPanel for your Web host.
- Open your "File Manager."
- In your "public_html" folder, create a new folder for this assignment.
- Open that folder, and click "Upload File." Browse to the file you've been working on and upload it.
- You should now be able to go to your page by going to an address like this:
http://yourdomainname.com/foldername/filename.html
Capturing Your Page
In addition to uploading your HTML file, I'm asking everyone to also take a screen capture of their entire browser window of the page they've created (See list of screen capture options above.)
Once you've captured your image, upload it to Flickr and tag it with the following tags: ds106, digstoumw, webstories
Write a blog post where you both embed the capture of your site (please don't just link to it -- make it visible in the post!!) and link to your online version.