
-
-
-
Sundae Summary
What a week! I had so much fun this week. We made Gifs! That was exciting! Now, I’ll probably be making all types of funny things to harass Kelly because she is the Meme queen! This week: I took four … Continue reading →
-
Photography Experiment: Phones and Light Painting
I found collection of stunning light painting photos and decided to try my hand at it for my experimental assignment. What is light painting? The short version is “drawing with a light source while a photo is being taken very slowly.” There’s a tutorial on youtube if you’d like some more in-depth instructions. The end ...
-
Weekly In Review
This week was filled with photo editing-fun! I created one more minimalistic poster, this time it was a straw hat from One Piece- click here to view it. Next I did something new to me, a GIF – click here. I also read a short story called Jon, by George Saunders, here is my response to ...
-
Weekly Summary
All of my photo creates, and my voyage into sharpness and image noise, are here. -
Learning about Sharpness and Noise
For this week I looked into Cambridge in Colour’s tutorials on Sharpness and Noise in photography, aspects of photo editing that I’ve never really grasped fully.
The tutorial discussed how sharpness can emphasize texture in a photo, so I looked through some photos I’ve taken to see if I can find a really textured one to try changing the sharpness of.

I picked this first picture because of the texture of the clouds. I wanted to see what it would look like if I messed with the sharpness and noise.
I looked into their guide to image sharpening to see what I could do with the clouds. I was most interested to learn about image noise, or film grain. I’ve always seen the image noise button on photo editing software but never understood how it affected the picture other than making it randomly blurry, so it was interesting to learn how it works in conjunction with other effects.
After messing around with the sharpness and noise of my cloud photo, I got a little more texture:

-
Reflectivity (Black and White Assignment)
It was previously heavily back-lit. I put a black and white adjustment layer over the base image. I pushed the blue and cyan sliders up to boost the reflectivity and brightness of the foreground surface (your interface might be different from the one I was using since I’m using CS6).
-
Improving a Character
This is the creation of my choice. I decided to take an already existing character (this is Roronoa Zoro from One Piece), and improve whatever I don’t like about the character. The character normally has green hair, very ugly green clothes and a dark sword. I decided to play with coloring. I changed the color ...
-
Swing Smile ( Rule of Thirds Assignment )
This is an assignment for my Digital Storytelling class at the University of Michigan. I tried to crop the image down to place the lower 1/3 grid points on the knees and the middle of the torso. The upper grid points fall on the edges of the cl... -
Weekly Summary
This weeks completed assignments:Response to "Jon" by George SaundersAnimated gifBlog post about what I learned from a tutorial link found in CtoolsFour daily shoot assignments: one, two, three and fourI felt much more comfortable after leaving the des... -
MACRO
For my research on an aspect of photography to share, I came across the world of macro photography. As you probably know, macro photography is taking big pictures of small things – "zooming in", if you will, on something to give it a lot of detail. This can be done in many different ways, especially if you have a professional camera (which I do not).
While there were many posts out there about having the perfect lens and being at the perfect distance from your subject in order to get the perfect macro shot, I unfortunately couldn't take in every aspect of macro photography from my iPhone. I tried my best though! I learned a couple things about shooting macro shots that I'll share with you:- Exposure is an important part of macro photography – you want to have a high exposure so you can really focus on what you are taking a picture of. Since exposure is the amount of light shining on any part of a picture, you want a high exposure if you're going to be focusing on something small that you're very close to with your camera.
- Lighting, in turn, is important because it goes hand in hand with exposure. You want to make sure you have a lot of light on your subject since it is the only thing in your frame (macro pictures are usually of one small thing that takes up most of the frame)
- Focus is the main point of macro photography, because you want your lens to focus on the right thing inside your frame. Since macro deals with focusing on mainly one small thing, you want to make sure your focus is on point so that your subject is clean and clear to see
Here's a macro picture I took using my acquired knowledge: So that's about it. Macro photography is really cool! I always like how macro pictures turn out, and learning how to compose them in a better way was really great. Cheers.
 -
Tower (Low Horizon / Sky Emphasis)
The tower in the photo is St. Andrew’s Episcopal Church in Ann Arbor, Michigan (Map of Location)
-
A photo that looks better in black and white. This was hard for…

A photo that looks better in black and white. This was hard for me, because in general I don’t like how stuff looks in black and white, but I just think this is a hilarious photo that, when put in black and white, gets this air of faux seriousness, despite featuring Lil’ Kim’s Hardcore album on vinyl. Special thanks to my cousin’s radio station for this choice shot.
-
Rule of thirds, taken at the park. Got the tree to the side…
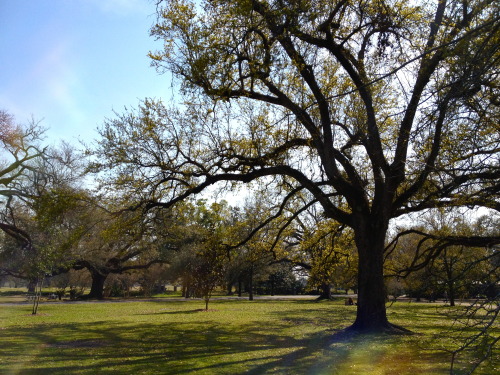
Rule of thirds, taken at the park. Got the tree to the side there. Absolutely beautiful weekend - I didn’t even edit this photo at all!
-
A high up horizon – so high up that it was taken from a plane,…
A high up horizon - so high up that it was taken from a plane, in fact. There are few things I love more than seeing a cloudy sunset from above. -
A photo with a repeating pattern. Got a nice shot of these…
A photo with a repeating pattern. Got a nice shot of these stools at a diner this weekend. I like that they correlate with the repeating lamps above them, and then on the left you have the chairs against the wall. SO MANY PATTERNS. -
"Cameras vs. The Human Eye" Reading Response
The article I read was an analysis of why eyes and cameras process the same image differently. The three main reasons for this are:Angle of ViewCameras have a wide angle of view, compared to our eyes' narrow angle of viewResolution and DetailUnlike the... -
-
The week in review
personal photo (set on saturation)
So many things to work on this week. I really liked the photo/design unit so far. I’d never made a .gif before and it was really cool to make it. I seem to put a theme certain project sets. My minimalist poster and .gif and ted talk were all Legend of Zelda themed. It can be fun to make our projects related to another interest because the ideas are open ended. I’m excited to see what our “first umdst class” project(s) will turn out like.
-
Daily Shoot: Rule of Thirds
Not the most interesting photo, but I think it does a good job at exemplifying the rule of thirds -
-
-
Daily Shoot: Black and White
My sister with Pigiodo, the family bird -
-
The same thing. I really liked this overall I wanted to explore…
The same thing. I really liked this overall I wanted to explore saturation. I’ve often seen pictures appear washed out or more dull than how they actually are and I wanted to see how color can be put back into photos so they look more vibrant. The color viewed here is fully saturated which makes the color so vibrant. I also increased sharpness, and shadow in this picture. Overall I just experimented to see how different bars can drastically or subtly change a picture. I also unsaturated a picture as well. The same picture can look very different.
-
Daily Shoot: Repeating Pattern
Porch furniture -
3-Point Lighting Setup
Right now I'm Gaffer on a short film for my 423 class. The Gaffer is in charge of setting up all the lighting on the set. As a result I've been reading a lot on lighting, and one of the first things that is mentioned is 3 point lighting. It's a basic l... -
Rule of thirds. I tried rule of thirds. This picture turned out…
Rule of thirds. I tried rule of thirds. This picture turned out okay. I took it with my phone and I was interesting trying to guess where the rule of third points were. I think I guessed correctly.
-
Repeating pattern of my peeps. My easter candy made a great…
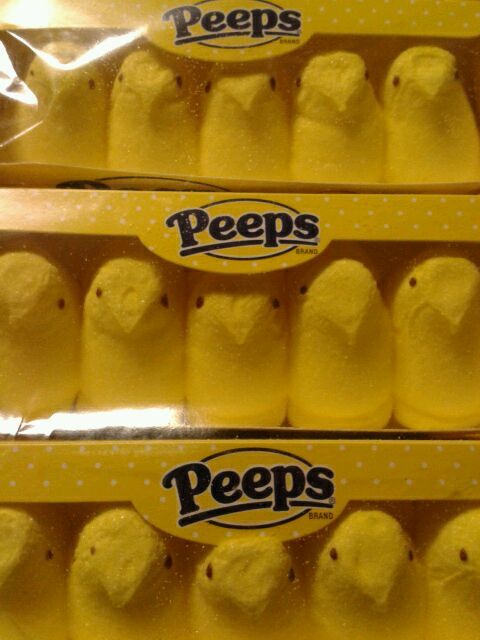
Repeating pattern of my peeps. My easter candy made a great subject for repeating pattern. It reminds me a little of Andy Warhol.
