Warning, all of these tutorials are made FOR 3-4 different programs. I tend to cross the gaps when using them. The programs are as follows: Audacity, Windows Movie Maker 2.6, GIMP, Paint.
General Tutorials;
Intuitive design:
This is what I am going to call being creative. Calling inspiration from a number of resources. You have basically two general fields that you may travel down with intuitive design. First being recycle and the second being generation. The majority of everything anyone does is going to be recycling. Looking at other things, mixing and matching ideas to push our entire thought basis into a slight variation that can be radically different then we may have expected. An excellent set of examples would be video games. The first, FPS (First person shooters) had an adventure more or less running through mazes or on pre-determined paths where events occurred that the player had a bunch of flashes and eventually something lay on the ground dead, either you or the enemy. Other games, such as RPGs (role playing games) attempted to have intricate stories that allowed for multiple different paths for the adventure and the game panned out as much an interactive novel. More recently these concepts are being combined. Look at any FPS today, and there is at least a forward explaining the premise of the game, and 99% of the time there is people that you interact with that either join or fight you based on their affiliations. On the other side of the sword, the top down view has almost been completely abandoned with RPGs, and you are either placed in a first person view of the world you interact with (see Elder Scrolls series, most recently Skyrim!) or is placed with opportune locations for cameras (see Final Fantasy) which is a slight modification of 3rd person shooters, which you can even do in games like Skyrim. All of video games concepts came from much earlier, either 1st person perspective, hell you can go hunting or to war today, or board games, remember the game of LIFE? Monopoly? Top down less interactive varieties of video games.
Now that we have given a general exploration of recycling content, what of generation. This is MUCH trickier, because if you think about it, everything you are going to do or have a concept of has a basis from before. This isn’t a problem, but on a slightly different note, this is where you can be hailed as a genius. In this time of great communication and allowed development, there is something that takes everything in a different direction, for example discovery of a new material or form of generating power (see Nuclear Power coming about in the ’50s, internet, transistors, etc) I suggest stumbling into new generation of concepts versus seeking them out. Doing things differently every time, not staying in your comfort zone is the best way to do so.
Good Luck!
Time management (This one is more for me than anything else.);
If this is taking more than 15 minutes, do not be as exact, unless you are working with multiple people or your final goal is a ‘flawless’ product. (a flawless product is not necessarily possible, so don’t get focused on that point, but on making a complete item, on which you shall improve)
This is if more for if you have due dates, want to keep a schedule, or just wish to not get ‘to deep’ into a project.
The initial action for time management is the planning stage. Before you do anything, you must figure out how much time you have available to spend on whatever project you are going to be working on. After determining the amount of time that is possible for your project to consume, set out a general outline of limitations for each step. (Generally steps are plan phase [you are in that right now], base, general build, analyzing, corrections, clean up, fill-in, analyzing, corrections, and finalization)
The planning phase is extremely important, but it can be as short as thinking of your planned final product followed by putting ‘pen to paper’ or it can be as deep (and long) as mixing the base build of what you are doing with the decision making of the planned final product. Depending on the amount of time and the size of the product I would generally suggest 15% of your available time be placed into this category (Other projects such as movies or video require longer planning phases will picture taking requires less). The base should be a quick generalization hammering out loose details and having a general direction; a couple of examples of this would be story boarding (for movies) or outline for a paper.
The general build is that of putting pen to paper, taking a ‘preemptive’ photo (hurray for instant review!), word vomiting facts, etc. This is where all of the unfocused undetermined work comes in. Using a video for example this would be where gathering a large amount of raw footage (shoots 1-5 persay) This is your first ‘real’ amount of work. This should take roughly 20% of your overall amount of time allotted.
Analyzing 1 better known as reviewing your work. This is where you re-read what you wrote, watch your first set of takes, go take a bath room break and reorganize your thoughts of what you planned. This can be roughly 5% of your time allotted.
Corrections 1, this is the time where you go to those things that had issues and correct them as best you can. Labeling or moving around what you have written in your paper, deciding what shots need to be re-shot, etc. I suggest about 10% of allotted time.
Cleaning up, better known as making sure that the corrections you have made don’t fit awkwardly. Making sure the lines in your drawing match up correctly. This should take at most the same amount of time to do as the corrections, but I suggest 5% of allotted time.
Fill-in is the next step for your general build. If you are doing a picture, this is where you put in all of your coloring, video is where you fill the gaps of the film, and for a paper putting in all your transition material. ~15% of allotted time.
Analyzing 2, rinse repeat of Analyzing 1, 7% on the time allotted as before.
77%
Corrections 2, gotta be precise, Cleaning up should be rolled into this and bridge the gap between this and going into finalization. 13%
Finalization, much like fill in, but this is where you Analyze your corrections, make sure the finishing touches are there, and everything is smooth with few if any problems. This is the best time to show people, and see if they see any errors. Varying opinions should be generally ignored, this is your product. 5%.
The last 5% should be used either in transition, set-up, or finalization. It is a buffer if per say you find a bug or a problem that you can quickly patch up. (Allowing you to be worry free until the finalization time)
Cutting;
I have already have done the cut for the following photos.
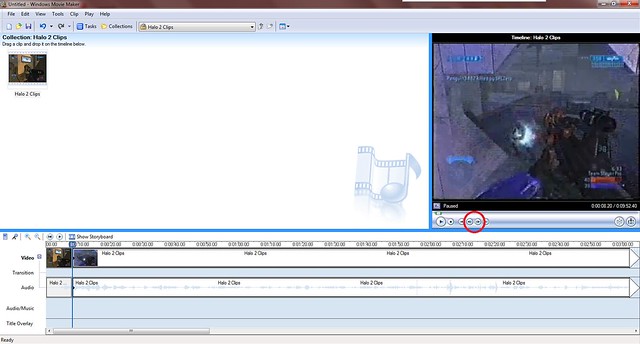
The red circles show what you click on to go either 1 frame forward or 1 frame backwards. So after you have selected or figured out where you want to cut clips. Once you have found the spot you are going to cut.
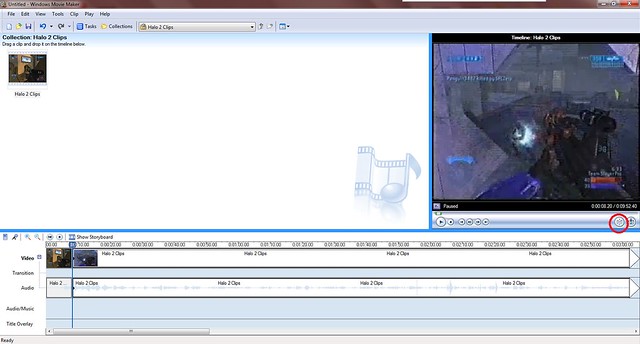
You click the button that is circled. Make sure that the video (or music) that you are going to cut is selected.
What should occur is that the new file name and a preview image should also show up. and appear like the red circled area.
Music/Sound Syncing;
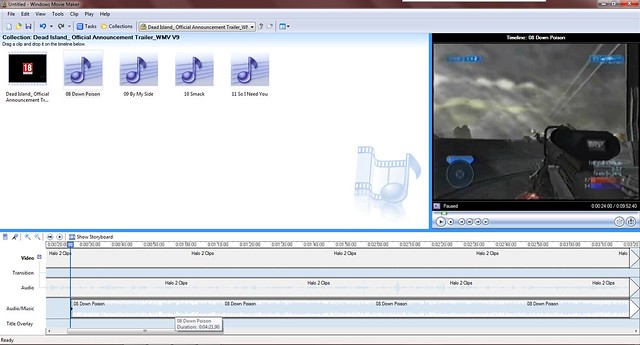
After importing the media. Drag and drop into the ‘music portion’ (as seen below)
Syncing is a difficult thing to do. It requires you to line up sounds and visual effects. There are two ways to do so. The first is if you have continuous footage (aka not easy to cut, adjust play speeds, or anything of that nature), you will need to find the part in the song that you are going to line up with the most important event that occurs. Look on the music tab and inside of the music section there are larger variations in the stream, these are the noisiest. An great example would be to line up that portion with an explosion or something of that nature. You can also go into audicity and do remixes multi-layer and create fade-in/fade-out effects so that the music/background noise all lines up as you want. The other side is where it is a montage. In this since your mixing a bunch of different clips to create a thrilling showing of something. You can cut, modify clips (change speed, overlap, etc) and break it into single images so that the highest point and even more finely all of the actions that occur within each clip to the music. This is more labor intensive, but can give amazing results.
Specific Tutorials:
Make a Pokemon Card:
2 Different ways that this can be executed. The first is from scratch, look at a pokemon card or google one, look at it, create each box, all of the coloring etc. This way is much more difficult and I suggest going the other direction, which is taking a googled pokemon card (or going to a website that has blank ones available). If you grabbed one from the web, you need to delete all of the text, the best way to do this is using one of the Select tools (Fuzzy Select Tool is awesome, just change the threshold) delete delete delete. Follow this with creating a new layer below the card, so there is empty space, and go to
Filters-> Renders -> Clouds. Play with these, till you get what you are looking for (you can select the colors via the normal color swashes) Drag and drop + resize an image that you shall be turning into a card. This should be on or near the top layer. Follow this with using the Text tool and fill in all of the fields that you deleted the text from. Then google the color that you made for the card (so Fire, google Charmander Pokemon Card etc.) use the Ellipse Select Tool to select just the fire circles for amounts of use, copy and paste on the project you are working on.
Look over your finished work and compare to the Pokemon Card that you downloaded, fill in any fields that you see which is filled out just as they have. Congrats you are done with this one!
Start by googling ‘terminator’, look at the images, and by the fourth page there should be either a skull only or a full body piece that should be a high enough quality to use (or use Terminator ‘the specific part you are looking for’) Create a new layer for your terminator piece and another layer (on top) for your main image/picture. Be sure to turn on/off the visibility of a layer and move the terminator image portion around so it lines up as if it is directly below, and of course scale it as necessary to fit properly.
Once you have completed this, select the Eraser Tool, clean our everything that is going to be shown as if it is part terminator. If you want use the Dodge/Burn Tool around the edge, to make it appear as if it was burned off OR use the Smudge tool and drag the edges around so that it appears to be ripped or torn. (these effects can be either make the image look outstanding or ruin it, so be careful and remember to take a step back every 15 minutes or so)
Wonderful, you have created a terminator thing mix. Go spread the word and be happy!
Make a Montage;
Make a montage, is rather easy to do for a simple project, but for the example that I gave when creating the assignment it is far more intense and even requires generation of entire footage using programs as complex as 3DS Max and adobe premier. I am going to explain how to do so on a less rigorous but effect manner. First become familiar with how to cut clips and syncing above. Follow the 2nd method I described for syncing. Collect them all in your editing software (Collections for Windows Movie Maker 2.6) and place your choice of music in the ‘audio/music’ section. Create an intro, via the tools -> titles and credits -> title at the beginning. Fill in as need be, stretch the time line out for a few seconds. (You don’t want to stare at it for 15s, and you don’t want to make it a single frame. So fine a comfortable spot with the duration) Once you have done this, make sure you have imported all of your clips, and start to sync them up with the music you have already brought down. Once you have completed this, create a ‘credit’ or ending title the same way you had generated the intro. Good job, you are done. You can finalize your movie by going into the file->save movie file button. Follow the directions, adjust settings as you see fit (or just hit next till finished)
Be a Commentator;
This is far easier then generating a montage. First find something you want to record your voice in, import and drop into your Movie timeline section, right click the audio section (assuming you have expanded it) and click on Volume, turn it down to about 50%. Press play, record yourself commentating the film. Use the ‘Narrate Timeline’ button. It is the 2nd button on your toolbar above the timeline. Once satisfied, using the cutting method to delete mistakes and re-recording publish your movie via File -> Save movie file; follow directions to publish. Congratulations you are done.


Add a comment