Wow, you’ve come a long way if you’re now reaching your Video Assignment week of DS106. Pat yourself on the back, it’s a lot of work and a lot of thinking! Since you’re here, you must be wondering how to create a video that kicks ass or just for the Everyday Modern Marvels Assignment! Well lucky you, I broke the ice(and am currently 12/4/2012 still the only one who has!) and now it’s time for you to top my video! But, I’m not worried about that, this tutorial is for you to see how I made my video. After watching you can go produce your own masterpiece and 1-up me!
So where to start…hmmmm
Step 0.5 – PREPLAN YOUR VIDEO!!!! Know what you want to do, and how you want to do it. This will save a lot of time, effort, and frustration in the long run!
Step 1 – As with any video/movie, you need, well…VIDEO! So go out with your plan, record what you need, then upload to your computer!
Step 2 – Hopefully you have your video uploaded in .wmv files and can load them directly into Windows Movie Maker. If you have multiple clips, this will mash them together so that there is no skipping/waiting on YouTube. (Like the two videos above!)
Step 3 – Go ahead and watch your video! Do you like it? Is it worthy of editing? If so, begin the editing process now! If there are parts you don’t want in the video simply go to Video Tools, and click Split where you don’t want the video. The clip will split and you can then select and delete it.
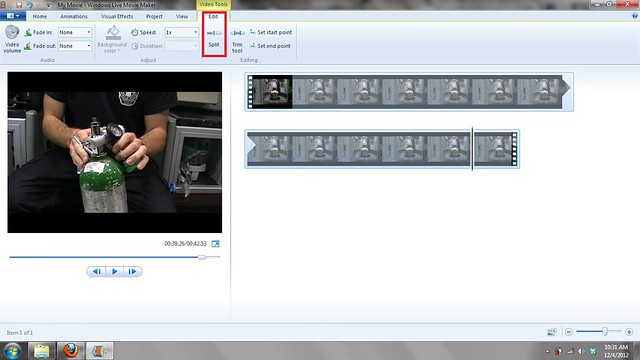
Step 4 – Next, you probably don’t want the audio that was used(unless that’s how you recorded it to make it easier on yourself) and cut out other people talking/background noise. For this, stay in the Video Tools, select Video Volume and then drag the bar all the way to the left.
Step 5 – Great, now I have a video without audio. Now what? Well you can snag music from the Internet, create your own audio, or BOTH! Let’s do both! Remember Audacity from earlier in the semester? Open it up! Now hit the Record button in Audacity and time it with what you want to say in the movie. (Scripting before talking usually works pretty well!) You can tile the windows side by side so that you can start the audio and then start the movie.
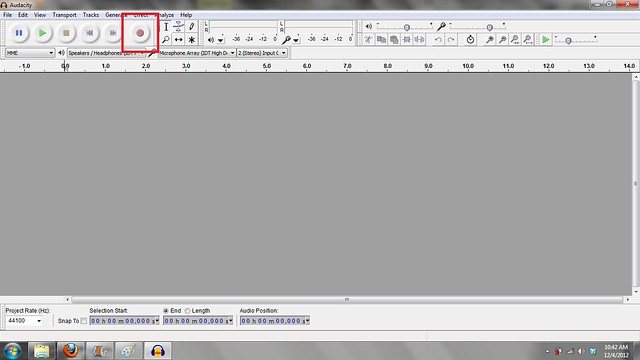
Step 6 – Edit your audio! You may have long pauses where you aren’t talking, you can get rid of those by highlighting the selected piece and hitting delete.
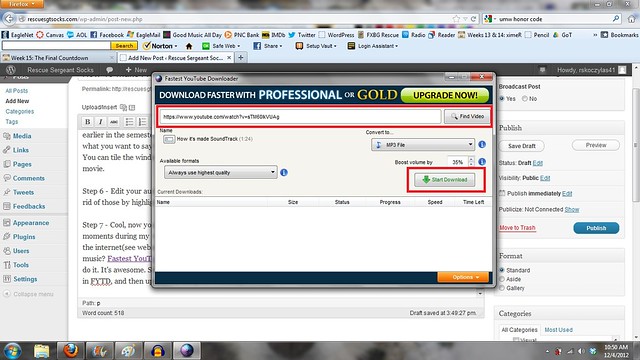
Step 7 – Cool, now you have a narration of your video. But wait, there is a lot of quiet moments during my video…what should I do? Simple, you can download sound effects off the internet(see websites from Audio Week) or you can just use music. How do you get the music? Fastest YouTube Downloader. If you didn’t download that earlier in the semester, do it. It’s awesome. So go to YouTube, find a video with the audio you want, paste the URL in FYTD, and then upload the MP3 into Audacity!
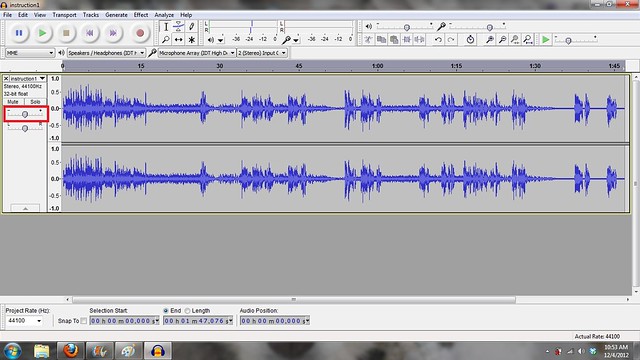
Step 8 – You probably don’t want your narration to get overpowered, so let’s lower the levels by using the Gain Slider. Export your new audio as a MP3.
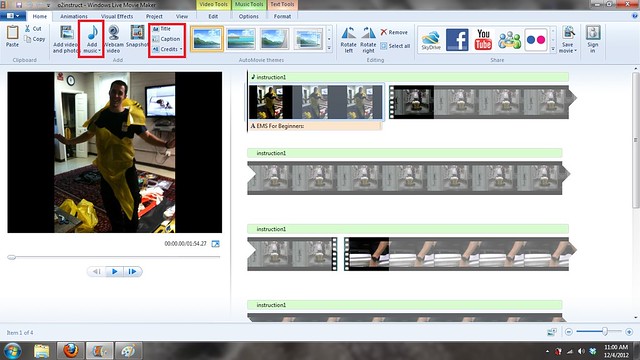
Step 9 – Back in Windows Movie Maker, go to the Home tab. Click Add Music, and find the clip you just created! Once it loads into Movie Maker, you can move the audio around to start on whichever clip you want.
Step 10 – Your movie should now be nearing completion. Final edits are in store, such as a Title and Credits screen. These can be found on the Home tab to the right of Add Music. Click Title and it will place a text holder and slide effect at the beginning of the movie. Click Credits and it will place a text holder and slide effect at the end of the movie.
Congrats on receiving your 3 stars! Now go blog about your creation and don’t forget to mention me! Get creative with your videos, and take what you learned from my tutorial and implement it to other assignments, Good Luck!


Add a comment