
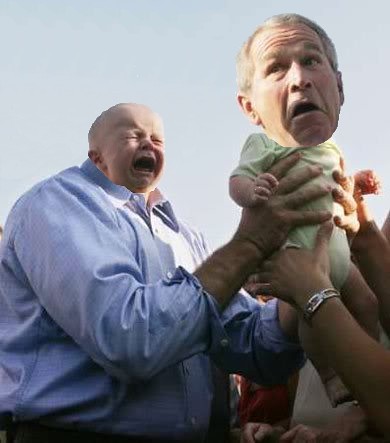
This is my second visual assignment, worth 2 stars. While it is not technically a parent-child headswap, I figured an adult-baby swap is close enough. There were two parts of this assignment that made it difficult. The first was selecting just the heads without making them look pixelated around the edges. The second part, which I thought was more difficult, was filling in the space around the baby’s head once i swapped it. I wound up having to create artificial sky, but more on that below.
My Process:
I used Paint.NET to complete this assignment. It is free and can be found here. To begin, I opened the original images with heads in their correct places. My first step was to select the heads and copy them to new layers. First I selected the heads with a rectangle select tool, then fine-tuned my selections in their own layers.
Here is the original image opened in Paint.NET:
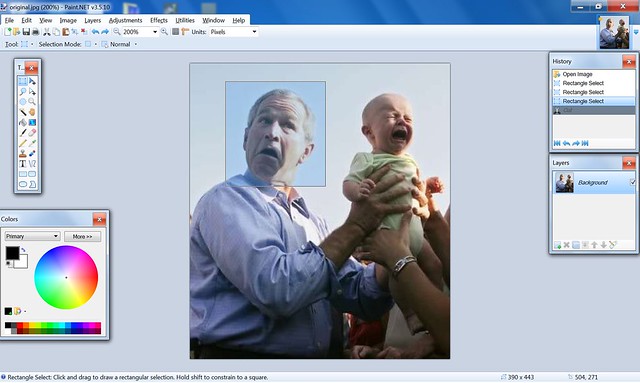
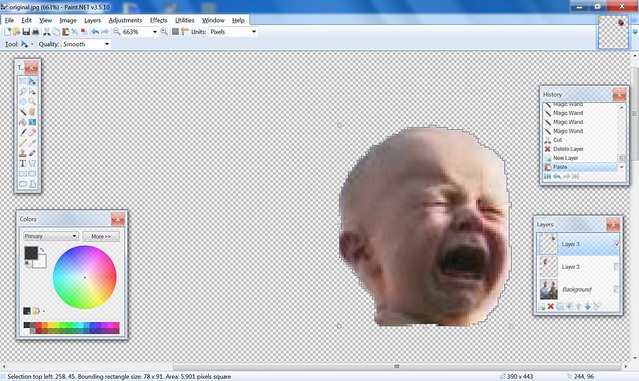
Many of the tools available in Paint.NET are just more useful versions of those available in MS Paint. In this image you can also see a layers box and history box. The layers box is pretty self-explanatory and allows you to easily manage layers. The history box is really cool. It allows you to perform unlimited undos/redos and can restore the state of your project to where it was when you made any edit. But back to the headswap. Once I selected a head with the rectangle, I pasted it into a new layer and began erasing everything in it that wasn’t part of the head. I did this using two different methods. The first was the standard eraser tool, which allows you to select a brush width in pixels. The second method was using the magic wand tool. This was trickier than the eraser, but faster and a lot more effective. The magic wand selects pixels that are similar in color to whichever pixel you click on. It allows you to specify whether you want to select global or contiguous pixels, the tolerance used to select them, and whether you want to add to, subtract from, or replace your current selection. I used this to select the sky (sky pixels are a lot more similar than baby pixels), and then I deleted my selection. The result was this crying baby:
Once both heads were isolated and happily in their own layers, I erased the heads from the original image. I used the plain old eraser tool for this, as precision was not particularly important. George Bush’s head would more than cover the baby’s, and the gap around the baby’s head was inevitable. So I set to work recreating sky to fill in the former-Bush-head gap. For this step I used a cool Paint.NET tool called clone stamp. Here’s how it works: First you select an area on the image to clone. The cursor is the outline of a circle (you choose the size — bigger outlines usually make the output look more believable). You press ctrl+click on the spot you would like to clone, and then a second circle of equal size appears and becomes your cursor. If you click and move the mouse, the clone circle moves in unison with your cursor. As long as you hold down the mouse button, whatever is under the clone circle is copied and drawn under the cursor. This is very convenient for copying backgrounds and making them look real. This is what it looked like while I was using it for the sky:

After this step I was basically done, at least with the hard stuff. All that was left was some simple dragging and erasing. I flipped George Bush’s head using the flip tool under the layers menu, then dragged it to its final location atop the baby’s body. I dragged the baby’s head in a similar manner. At first I tried to give the baby a neck using the clone stamp, but that’s when I realized the clone stamp is not good for all tasks. The baby’s neck looked a lot like a triple chin. So I ditched it and moved the head lower. The final step was trimming the real necks to make them look more natural on the wrong bodies. I just used the eraser for this. It took some time to get used to the tools in Paint.NET, but once I figured them out they worked really well. I would advise experimenting with it.

Add a comment