
For this assignment I had to create a scene or film from a horror film. This assignment took a TON of time. By the time I got to editing, I had over 25 clips. I had a mood in mind that I wanted to create, and shooting for a scary movie… is well difficult. Lighting, sound, speed, and angle are really really crucial- moreso than in other genre’s I believe.
I think this was a great personal success though. I can feel the emotion, and hope you can too!
TUTORIAL:
1. First I shot scenes , usually only a few seconds in length. If you don’t have a light on your camera, use a small lamp to light a room (make sure it’s BEHIND the camera though). You can also light a room down the hall or next door (I did this in the hallway scene at the beginning of the video). Experiment with panting, screaming, and shaking the camera to create moods as desired. I used candles as well in a lot of my scenes.
2. The opening scene, I held the camera myself and lit a candle. I recorded myself panting and shaky, and just walked to the closet slowly.
3. The hallway scene was shot in a dark hall, I had a room down the hall (behind me) lit. And then used the bathroom lights to create a flickering effect by turning them on and off.
4. I simply had someone stand next to the candle out of line of sight, and blow the candle out to imply an erie presence once the closet was open.
5. The scene where the closet monster/ghost walks by, I used my younger sister in a black hoodie. She just walked past the camera creeply.
Now that you’ve shot a few clips, upload them onto your computer. You are now ready to edit them into a scene…
1. I opened Window’s Live Movie maker
2. Went to the upload videos and photos button and uploaded the scenes I wanted. You can move them around to order them as you please. Use the split button under the edit tab across the top to cut scenes up into pieces.
3. After ordering and splitting scenes as desired.. you can use the animations tab to have scenes fade in, or animate in in a certain way. That is how I got some of my scene changes to blot out.
4. Using title and credits buttons under the home tab you can ad whatever titles and credits you please, and customize them in terms of font, color, size, and even how the enter and exit the screen.
5. Finally use the add music button to add sound from a file to the video, at whatever desired location in the video. You can fade the sound in and out (I faded mine out at the end) by going to the music tools options tab. I searched and downloaded my sound clip from freesound.org , and you can edit them using audacity if you choose. I did not edit the sound clip at all for this assignment, I liked it and just simply put it into my video.
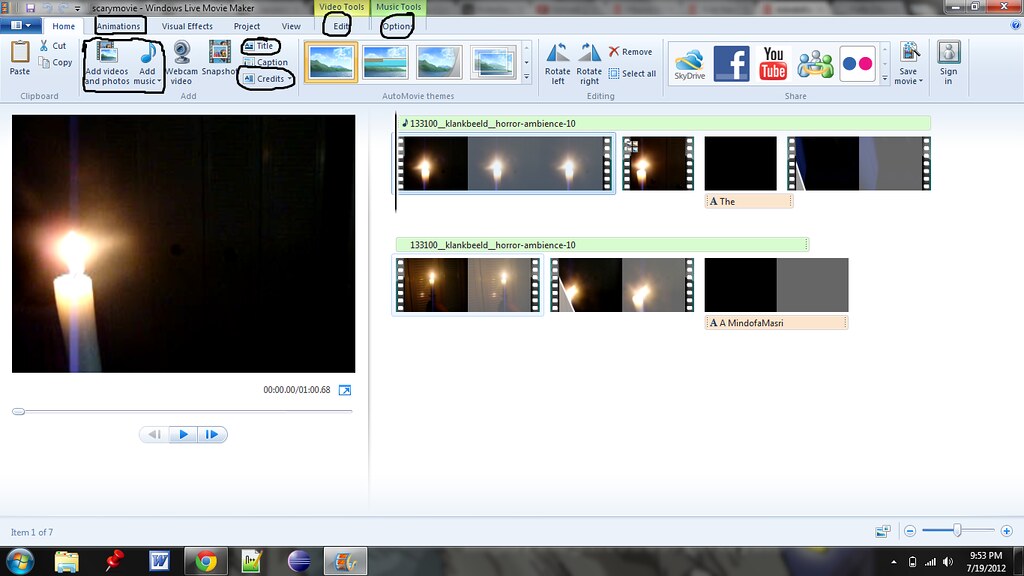
This is a screenshot of the home tab… I have the things I wrote in bold circled, it’s very easy to navigate.
Also… don’t forget to have fun, experiment with it, and share!!!

Add a comment