-
We enjoy the Holiday Season
-
We Are Nerds. So how do we reach our students?
It suddenly struck me, a couple of weeks after I finished my PhD, that I was a nerd. This should not have come as a surprise, since I have been a high achieving student throughout school and college, and loved … Continue reading →
-
To blog or not to blog? The academic blogging question
This blog post reflects on my reasons for starting this academic blog. If you have followed me over the past six months or so, you’ll know that finishing my thesis seems to have started a seemingly never-ending stream of semi-reflective, … Continue reading →
-
Playing with CMAP
Here I’m experimenting with mapping things out with Cmap Tools. I used Vannevar Bush’s seminal article “As We May Think” as the central concept and connected some related things, like a little about the author and what he envisioned, and … Continue reading → -
#headlessds106 is over; #ds106 continues #4life
Where has the time gone? Seems like just last week was August 26 and the beginning of the headless ds106 class. Now it’s past Dec 13, class is over, out with a bang. Along the way, where are all the people? There’s a hundred and some odd folks on the G+ account for the class, […]
-
In Open Courses Our Glasses Remain Proportionally Empty
You don’t [usually] pay for an open course. You don’t depend on it for a grade. You have nothing at stake except your own interest in a topic. “Failure” and “dropout” are words without meaningful meaning here. But we cannot help ourselves, Not reaching the finish line is something we apologize for. We measure ourselves not by what we did but we did not do. Of course my assertions are based way too much on my familiarity with ds106 and all the Coursera courses I failed dropped out of signed up for. Michael Feldstein nicely laid out the complexities of learner motivation in what ends up over simplified- the “Myth of the Unified Course Goal.” Facebook says it better about the student course relationship– “It’s complicated”. We’ve more or less wrapped up a 15 week experiment with a headless ds106 course, culminating in a fantastic final project that was not […] -
Curtains for crime time
Our True Crime class has come to an end. As all of the students have been saying, it was a lot of work, but it was worth it. And it was worth it because of the students – the truecrimers … Continue reading → -
How I got the boo ghost into the GIFaChrome film

The past two weeks have been a blur. For the last two weeks of the Headless13 installment of ds106, several of us have been working together on a group project around a fictional camera called GIFaChrome.
How did this come about? While I was utterly swamped with work, I one day noticed a tweet or two referring to blog posts or G+ posts that had to do with something called “GIFaChrome.” Here is a page with a few Storify stories that explain how it all unfolded. The short story is that Rochelle Lockridge came up with the idea of putting an animated gif into a film frame and lots of people added in their ideas from there, including that there should be a camera that takes images and turns them into gifs (I think that was Mariana Funes’ idea). Then came the idea of putting glitched gifs into the frame, and so GLITCHaChrome was born (can’t recall the provenance of that one). John Johnston developed "LayerCake," which allows for images to move OUT of the frame! There is also GIFaKidChrome, which makes animated gifs from the audio of children’s stories—that one was the product of spontaneous riffing on an image that originally came from a daily create assignment, a spot of riffing I was so sorry to miss but loved watching unfold.
I’ll do another blog post soon reflecting further on this GIFaChrome project and the Headless 13 course as a whole. This post is dedicated to explaining how I did the gif at the top of this post. This was meant to be part of the GIFaChrome story, as a testimonial from a beta tester (see my previous post).
For a daily create earlier in the course we were asked to make an image of another ds106 participant as a ghost. I was trying to do one of someone else when my son heard about what I was doing and insisted he wanted to be in the picture. Thus, he is the ghost.
Making a gif from the original image
Here’s the image I started with, which I made in GIMP. Here’s a link to it on Flickr, in which I explained briefly how I made it.

When I made this image in GIMP I had two separate layers, the one with my son as a ghost and the background forest layer. That made it easy to create a gif out of the image.
Before duplicating layers, I used the “blur” and “smudge” tools around the outside of the ghost layer so it didn’t look quite so “cut out” but more blended into the background a bit.
1. I first duplicated the image of my son as a ghost several times so I could have multiple layers to move around.
2. I wanted the ghost to “glow” a little, so what I did was select a layer, go to Color->Brightness-Contrast and played with the contrast a bit. Then I did the same only a little more for the next layer, and again for the next layer, then I started dialing it down gradually by the same amount for the next few layers so it would pulse a bit.
3. Then I moved each ghost layer a little bit to try to make the movement look smooth and somewhat ghost-like. At first I had the ghost move around in a circle, but my son nixed that: “Ghosts don’t move in circles, mommy. They move up and down.” Okay, so I started over and made it move up and down (and a little bit side to side too, even though that wasn’t what I intended at first). I had to keep making various layers visible and invisible (by clicking the “eye” icon next to them) so I could see how the ghost would move when it cycled through each layer.
3. In GIMP, if you go to Filters->Animation->Playback you can see what the animated gif will look like. Except that if you just have a bunch of ghost layers and one background layer you’ll just see the ghosts move and then the flash of the background. To see the finished product as it would really look, I had to duplicate the background so I had as many background layers as ghost layers, and put a background layer under each ghost layer.
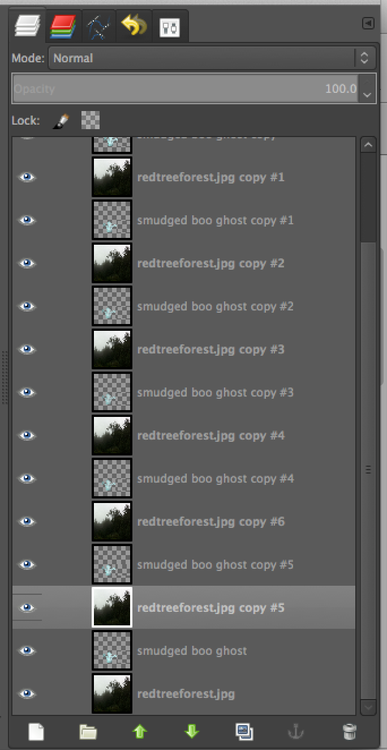
Then I had to control-click on each ghost layer and choose “merge down” so that each ghost layer merged with the background layer under it. Then, when going to Filters->Animation->Playback I could see what it would really look like.
5. The problem was that if I didn’t like the movement and wanted to re-do it, I was unable to do “undo” for enough times to get the layers unmerged. I was able to use “undo” for most of the layers, and then it just wouldn’t go back any further. So I’d have to close the file and start over, which kinda sucked because then I had to re-do the glow again from step 2. Boo.
6. Finally I had a nice looking gif, but the file was too big. So I first used the “crop” tool to crop the image to approximately a square, and then went to Image->Scale image to get it to about 450px x 450px.
Putting the GIFaChrome frame around the gif
Rochelle Lockridge provided a GIFaChrome template on her blog, which I downloaded. It was a photoshop file, but turns out that opened in GIMP just fine.
Here’s what I did to get my gif into the frame.
a. I first opened the GIFaChrome frame template in GIMP, and tried to use File->Open as layers to open up my GIMP xcf file with the gif I had just made. But what it kept doing was opening it up in one of the “layer groups” in the template file, which wasn’t going to work for animation. The screenshot below shows the various layer groups in the template files.
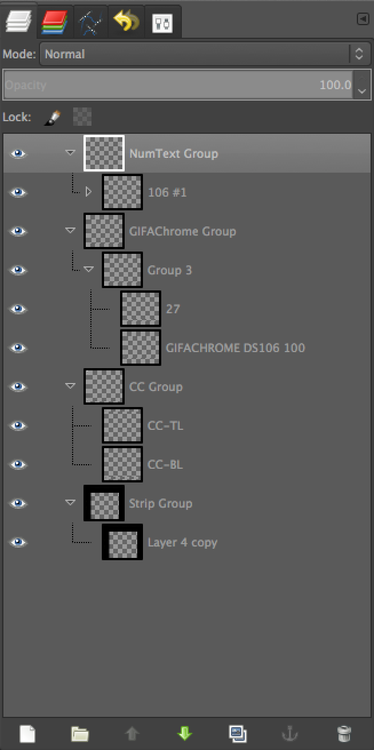
I realized I’d have to somehow get these groups into one layer so I could copy that layer and put it above each of the layers in my animated gif.
b. I discovered how to do this. First, I control-clicked on the top layer in one of the layer groups and chose “Merge layer group,” which put all the parts of the layer group into one layer.
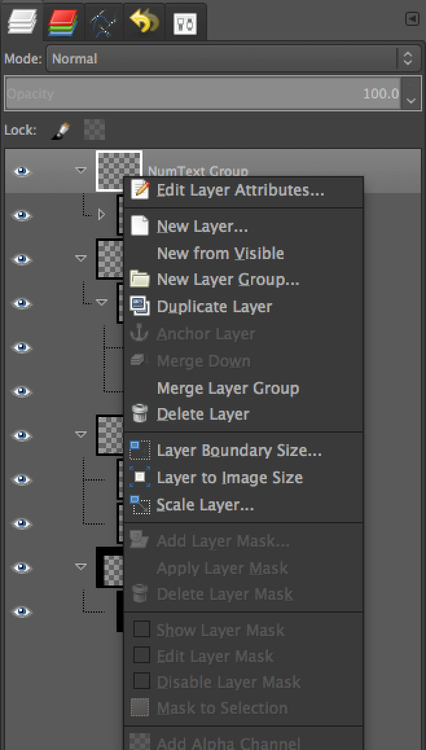
That gave me four layers instead of four layer groups. Then I had to get all those layers into one layer so I could duplicate the whole thing easily. I just control-clicked on each layer and chose “merge down” until I had one layer.
c. Then when I did File->Open as layers and opened the GIMP xcf file with my ghost gif in it, it simply opened all those layers onto new layers, not in any layer group. Perfect!
d. Of course, the frame layer was not the right size for my animated gif layers, so I had to scale the frame layer down so it would fit.
e. I duplicated the frame layer enough times to put one above each gif layer, and then used control-click on each frame layer and chose “merge down” (just as in step 3, above). Voila! I had layers that would animate as a gif just fine.
On the GIFaChrome website, this gif has sound attached, I think through the way John Johnston explains here. I don’t think I can do this on Tumblr, though maybe through the “html” function it would work. At any rate, it’s his own voice to go along with the image!
-
My year in trees and clouds
Let the pictures speak for themselves. For more, go to: http://www.flickr.com/photos/79017140@N08/sets/72157638675490533/ Where mentioned, tree pictures were inspired by Cogdog’s amazing photography on Flickr available: http://www.flickr.com/photos/cogdog/ (CC BY). Even better, have fun making your own! Just crop an image at an interesting point, … Continue reading → -
GIFaChrome House Band Rocks
Meet the GIFaChrome House Band The Headless Inkspots GIFaChrome is proud to be sponsoring the debut of their soon to be hit single during our official product launch celebration on DS106 Radio 12/13/13. “GIF-A-CHROME... -
106 Bullets
#ds106 in 106 bullets wonderful from @mdvfunes http://t.co/eduCBbm4Em — john johnston (@johnjohnston) December 14, 2013 So I encountered this tweet this morning from John Johnston via David Kernohan which points to this Tumblr from the ds106 shrink. “106 bullets” naturally … Continue reading → -
How I fell Off #DS106 and Bumped My Head
I’m not sure how it happened but sometime around Thanksgiving, I fell off the DS106 Headless Course Wagon Train and bumped my head. Prior to that, I was deeply engaged and deeply involved in the creative storytelling adventures that unfolded, from audio podcasting to gif creation to … well, the gamut of ideas ran far […] -
The GIFaChrome Experience
I have no idea how to even blog what culminated today for headless ds106. Maybe it was because what was in the boxes. Trying to write this up sells it short. But one ought to try. This is in lieu of a more comprehensive it-might-be-blogged-one-day-before-the-sun-burns-out post for what has happened the last 15 weeks since we launched this half baked experience. Today, we ran a live performance of what has emerged over just a few weeks, and completely supplanted the idea of having a final project in the course. The entire GIFaChrome idea (see a narrative of the unfolding) emerged from Rochelle Lockridge’s effort at a remix assignment… and it just mushroomed from there to glitch art in Google plus, John Johnston’s app, an amazon product page, layercake technplogy, dogs giffing, commercials, music, and then it jumped over the shark into a narrative of its own and its own web […] -
DS106 in 106 posts and 106 bullets published at 1:06
It has been a roller coaster. I will be unpacking the experience for many moons to come.... -
Meet Mariana – GIFaChrome CLO
Meet Mariana, GIFaChrome’s Chief Learning Officer, resident Cyberpsychologist, Social Committee Chair, and all around morale pumper-upper. She’s also the person who our mascot, Colin The Dog, has chosen as his caregiver. As CLO she has... -
Now You See It
Make an appearing video!
-
Gifachrome – Have you got yours, yet?
[View the story "Gifachrome - Have you got yours, yet?" on Storify] -
Giftbox Excitement
Happy GIFaChrome beta testers are excited to receive their surprise gifts in the mail this week. They’ll all be opening them together at the conclusion of the DS106 Headless ’13 sponsored GIFaChrome Radio Hour... -
Friday the 13th. Forget Jason. It’s a ds106 GIFaChrome Launch / Headless Campfire Jamboree
It’s almost here; a double headed blow out event that brings together 2 strands of Headless ds106 together. It’s a GIFtastic camera and a campfire! And we burn some old media! You can tune into these LIVE on ds106 Radio. The emergence of the GIFaChrome phenomena and its interest amount ds106ers has enabled us to […] -
GIFaChrome onWikipedia and Amazon
We are proud to announce that our crack Communications Department, headed by Christina, and our VP of Marketing & Sales, Jess, have finished producing the: GIFaChrome Wikipedia Page GIFaChrome Amazon Product Page We are up... -
Meet Alan – GIFaChrome Resident Prankster
Introducing Alan Levine – GIFaChrome’s Resident Prankster For 2013 Alan joyfully participated in our Executive On Loan program sharing his business experience with the innovative non-profit organization, DS106. The crew over at DS106 were... -
Peace Like a River
“How do you feel? Write about its opposite.”
-
ds106 Radio Rises From the Ashes
cc licensed ( BY SA ) flickr photo shared by Alan Levine The ds106 radio has been silent for 2 days. The station doors were locked shut, lights off, and only faint sounds of scurrying and muffled electrical tools were heard. But as reported by Grant Potter, the ice weasels were successful in rebuilding a newer and more flexible system. Some new features in the Airtime software are making me reconsider the previous approach to managing the scheduled content, the stuff that plays if there is no live broadcast. In that approach, I had divided each day into 8 hour blocks, and asked people to go in each week and populate it with content. This has worked well the last few months- I know that Bill Smith, Andy Forgrave, Christina Hendricks (and maybe others) were pitching in. But the tedious part was having to fill in content every week. The […] -
Little Boo is thrilled with GIFaChrome
Another excited future GIFaChrome enthusiast shares his story. (Click on image to toggle audio on & off.) Little Boo GIFaChrome image CC licensed (SA) by Christina Hendricks I am so thrilled about my beta... -
Roxy Louridge – 1st GIFaChrome Inventor
Recently, in the archives of the Smithsonian museum, a researcher found a recording and brought to our attention, as he studies the history of photography and is interested in our work because it represents... -
The Hasselhlof Video
As part of the ramp up antics for the ds106 headless double header extravaganza Friday, I managed to get a video that represents a real problem for the GIFaChRome folks The full story and innuendo has been published there by possbile rogue or double agent BB. The silliness does not stop, the shark is not […] -
Those I miss
As this run of DS106 comes to an end, I am starting to reflect on what the experience has meant... -
ds-ina: This is a guest post by the boy ghost in the image…

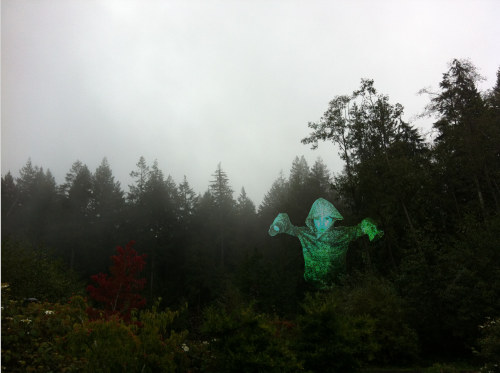
This is a guest post by the boy ghost in the image above, who has chosen to remain anonymous.
I am so thrilled about my beta test of the GIFaChrome camera! I was able to get a version of the camera from my friend Ina, and she kindly agreed to take an image of me that shows my real nature. If you hover over the right side of the image above you can see an arrow pointing to the old image Ina took of me, a boring old still image. It does me no justice, as you can tell when comparing it to my GIFaChrome image. Whoever heard of a ghost that doesn’t glow and move?
This camera is so easy to use: all you do is point and click and a beautiful animated gif appears. It’s like magic! You don’t even have to have full material substance to work the thing, as I have been able to play around with it myself (though I still need practice, and this pic by Ina is the best image so far).
The only thing that is missing from the GAC image is my lovely “booooooo-oooooooo-oooooo” sound that I tend to make when floating in this way. But those people over at GIFaChrome are so clever, I expect this will be available in a software update soon!
The GIFaChrome launches December 13, 2013. To pre-order yours, go to the GIFaChrome website!
Yes! I hear they have John Johnston the Chief engineer working on adding sound to animated gifs. I think it will definitely allow you to add the boooo hook sound to your lovely image. Although I think initially it will not play automatically but you will have to click on the image before it plays. See this test image: http://johnjohnston.info/106/simple-glitch-update/
-
This is a guest post by the boy ghost in the image above, who…
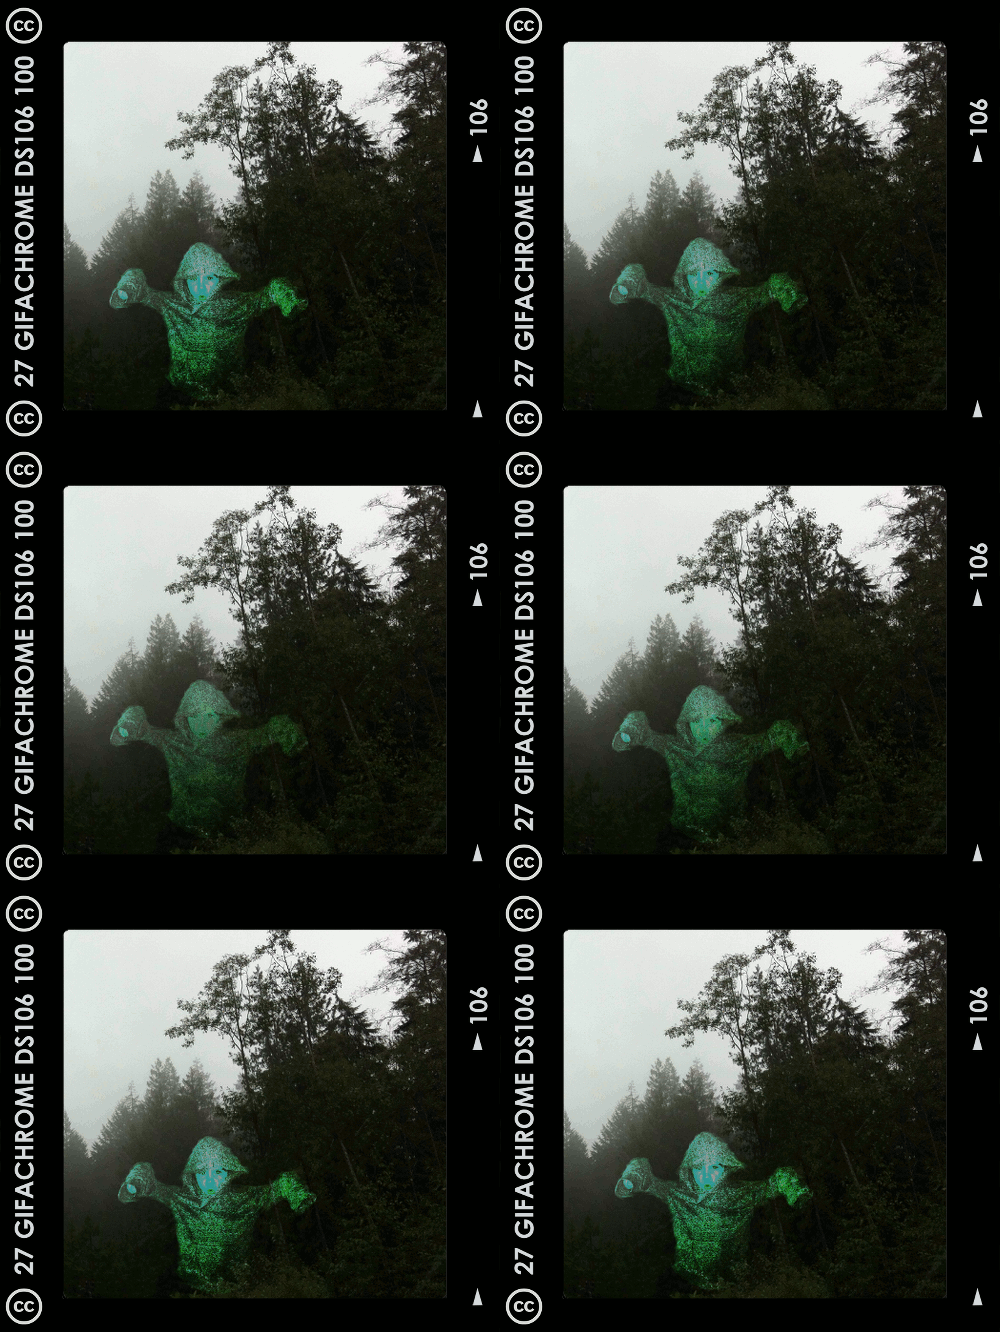

This is a guest post by the boy ghost in the image above, who has chosen to remain anonymous.
I am so thrilled about my beta test of the GIFaChrome camera! I was able to get a version of the camera from my friend Ina, and she kindly agreed to take an image of me that shows my real nature. If you hover over the right side of the image above you can see an arrow pointing to the old image Ina took of me, a boring old still image. It does me no justice, as you can tell when comparing it to my GIFaChrome image. Whoever heard of a ghost that doesn’t glow and move?
This camera is so easy to use: all you do is point and click and a beautiful animated gif appears. It’s like magic! You don’t even have to have full material substance to work the thing, as I have been able to play around with it myself (though I still need practice, and this pic by Ina is the best image so far).
The only thing that is missing from the GAC image is my lovely “booooooo-oooooooo-oooooo” sound that I tend to make when floating in this way. But those people over at GIFaChrome are so clever, I expect this will be available in a software update soon!
The GIFaChrome launches December 13, 2013. To pre-order yours, go to the GIFaChrome website!
Here is my ooooooo-oooooooo-booooo sound, just so you know what a lovely voice I have!
-
Message from Hasselhlof Camera
I’ve been keeping a low profile as part of my assignment to look after GIFaChrome information security, but my Amernian contacts have slipped me a video message from Dexter Hasselhlof, the eclectic founder of...
